
How the Range Rover P38 Electronic Air Suspension (EAS) Works
Introduction
The notes below are based on knowledge accumulated through research, P38 enthusiast forums and good old trial and error.
I do not presume to know everything there is to know about the EAS, and if I have got something incorrect please let me know through the usual channels – PaulP38a at http://www.AULRO.com or Paul Snr Cordwell at the Range Rover P38 group on Facebook https://www.facebook.com/groups/RRP38/.
A PDF version of this page may be downloaded from HERE, however, this page will always be same or more up to date than the PDF version.
Basics of Operation
Important stuff to note about the EAS:
- If a door or the tailgate is open, the EAS will not adjust (unless you are moving at more than 8kph);
- If your foot is on the brake pedal, the EAS will not adjust (unless you hold it for more than 3 minutes);
- Pushing in the EAS Inhibit switch on the centre dash will prevent the car from changing height between Standard and Low height settings;
- In automatic mode, the height of the car will drop from Standard to Low (Highway) height when speed is maintained above 80kph for more than thirty seconds. It will return to Standard height when speed drops below 60kph for more than 60 seconds;
- When parked and with the engine off, the car should never raise its height. It will automatically wake up every few hours to check and adjust height, but should only ever adjust down to the lowest height sensor reading.
Fuses and Relays:
Relay RL20 and MF2 30 Amp Maxi-fuse control power to the diaphragm solenoid and compressor.
F44 (F29 on post-99 models) is a 10 Amp fuse which controls the EAS ECU, the valve driver pack and the pressure switch.
The delay timer under the front left seat maintains power to the EAS after the ignition is switched off, and wakes it up every few hours to adjust downwards to the lowest height sensor reading..
Height Sensors
These are simple potentiometers that have a 5 Volt reference voltage modified by the dial position on the sensor, and fed back to the EAS ECU. Valid readings are between 40 and 255 bits when read by a diagnostics tool. These readings do not necessarily have a direct bearing on actual heights between each corner, so always use a measuring tape or similar to set correct heights.
At the front, the height sensors are connected between the chassis and the radius arms.
At the rear, the height sensors are connected between the chassis and the trailing arms.
Air Compressor
The internal thermal sensor should cut out at approximately 120 DegC, allowing the system to cool down for three minutes. If the thermal switch is still tripped (open path to ground) after three minutes, another three minute period will start and repeat until the thermal switch path to ground is closed.
Air Dryer
Potentially moist air from the compressor passes through the dryer before entering the main body of the valve block to the air lines.
When exhausting from the air springs, air passes back through the dryer in the opposite direction to flush out moisture through the exhaust port on the valve block.
Air Tank/Reservoir
A 9L air tank is mounted to the chassis roughly under the right hand seats. A single 6mm air line is used to supply and exhaust air to/from the tank. The tank has a plug to drain accumulated moisture.
Air Lines
6mm air lines go to the air springs, and the line to/from the tank, plus the short line between the compressor and valve block.
A 4mm vent line exits the diaphragm solenoid.
8mm air lines are used for the two lines between the valve block and air dryer.
Valve Block Components Overview
Main components are:
- A solenoid for each air spring to allow air in or out, operated by the driver unit (aka Valve Driver);
- A solenoid for air ingress, and one for air egress/exhaust, operated by the driver unit;
- A solenoid to operate the diaphragm which controls the direction of air flow, activated by the compressor relay;
- A pressure switch controls operation of the compressor. Below approximately 115psi (790kpa) the compressor should operate, and cut out at approximately 150psi (1030kpa).
- A relief valve vents excess pressure inside the valve block at approximately 180psi (1240kpa).
- A silencer is screwed in to the smaller block to quieten exhausting air.
- The driver unit (aka Valve Driver, the black epoxy casing at the side of the valve block) controls the current to the six solenoids (the diaphragm solenoid is operated by the compressor relay) to give a pulsed voltage, which prevents the coils within the solenoids from burning out
Note in the diagram below, the shape of the three Non-Return Valves is representative of their shape rather than function, i.e. the arrow heads DO NOT represent air flow, rather the shape of the cone end of the NRV. Air flows in the opposite direction to the arrow head, and is blocked by the o-ring on the cone of the NRV.
Click the image below to open it in a new window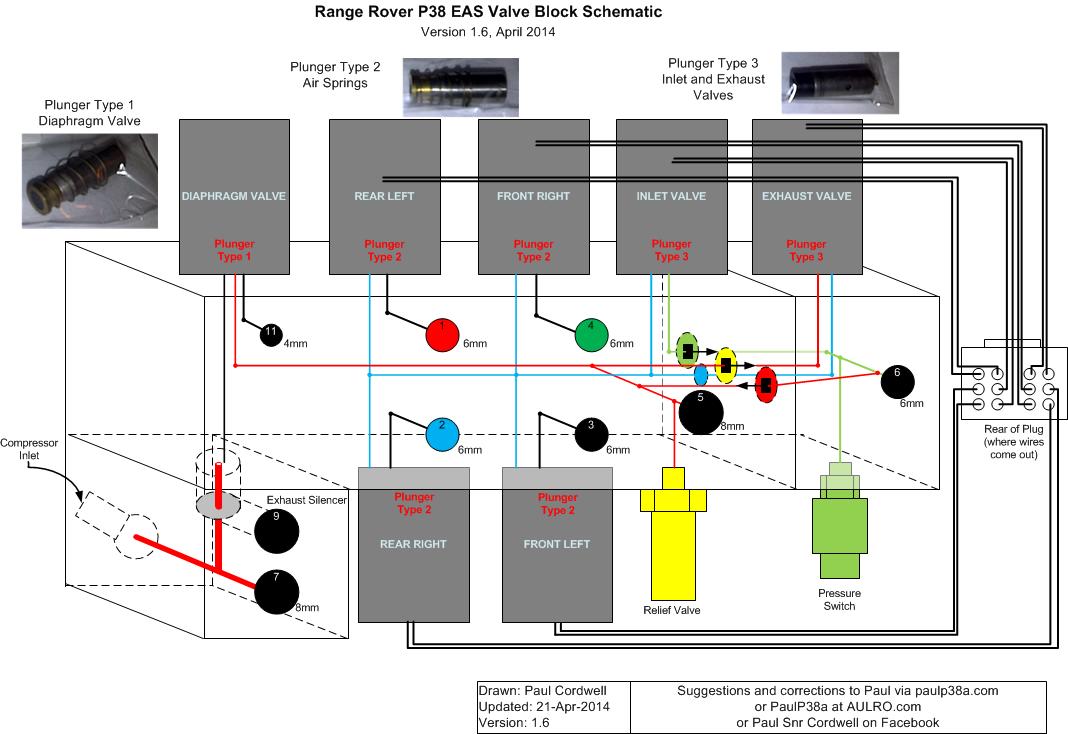
How the Valve Block Operates
When filling the Air Tank
Click the image below to open it in a new window
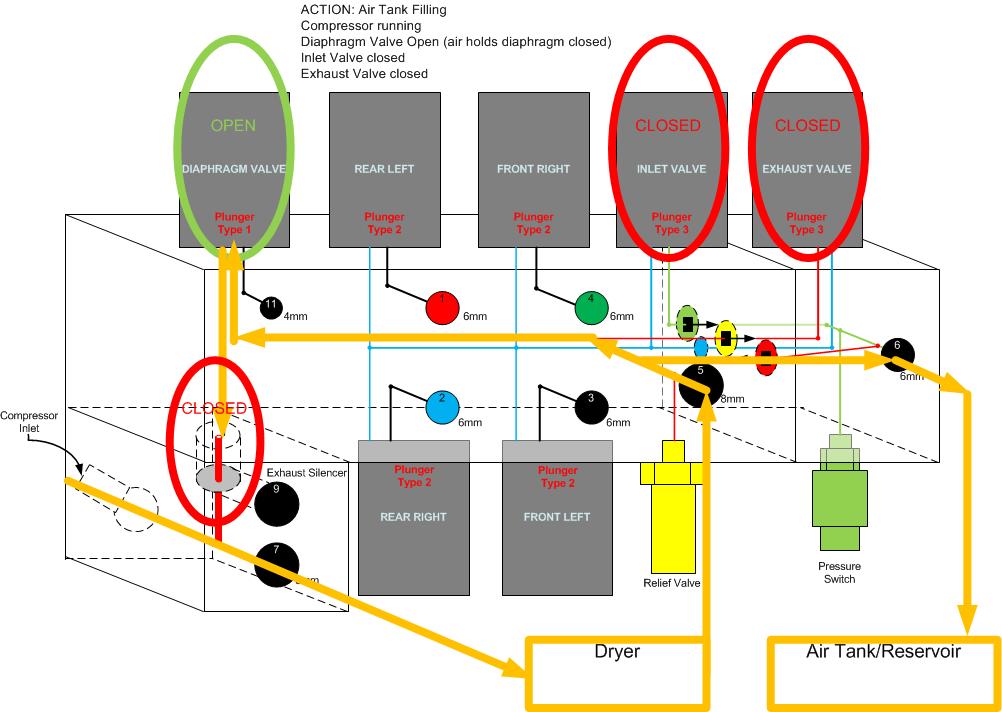
When the compressor is running, the compressor relay RL20 also operates the diaphragm valve solenoid which forces air down over the top of the diaphragm and holds it closed. This directs all incoming air from the compressor through the dryer via port 7 and back in to the valve block at port 5. With the inlet valve and exhaust valve closed, no air can flow to/from the air spring solenoids, forcing all air to the tank via port 6.
When the Air Springs are Inflating (front left shown)
Click the image below to open it in a new window
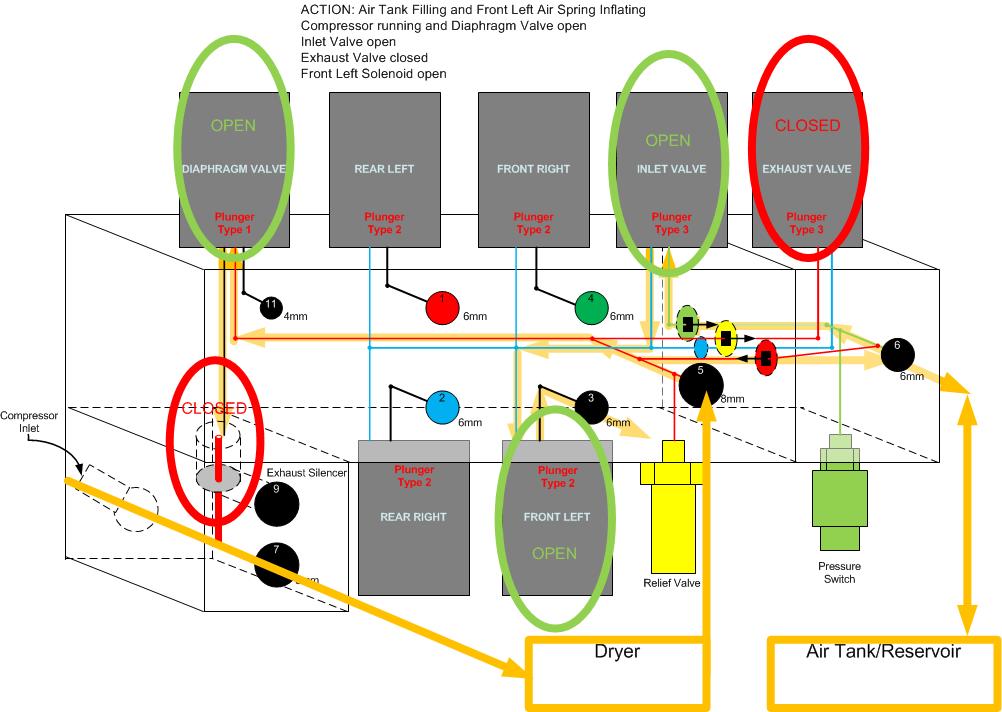
Generally, the compressor will be operating when one or more springs are inflating, but it does not have to be.
The diaphragm valve solenoid is open to allow air in the system to hold the diaphragm closed.
The exhaust valve solenoid is closed to prevent air exiting via the diaphragm valve.
The inlet valve solenoid opens to permit air from the tank (port 6) or compressor to flow to whatever air spring solenoid is open.
When the Air Springs are Deflating (rears shown)
Click the image below to open it in a new window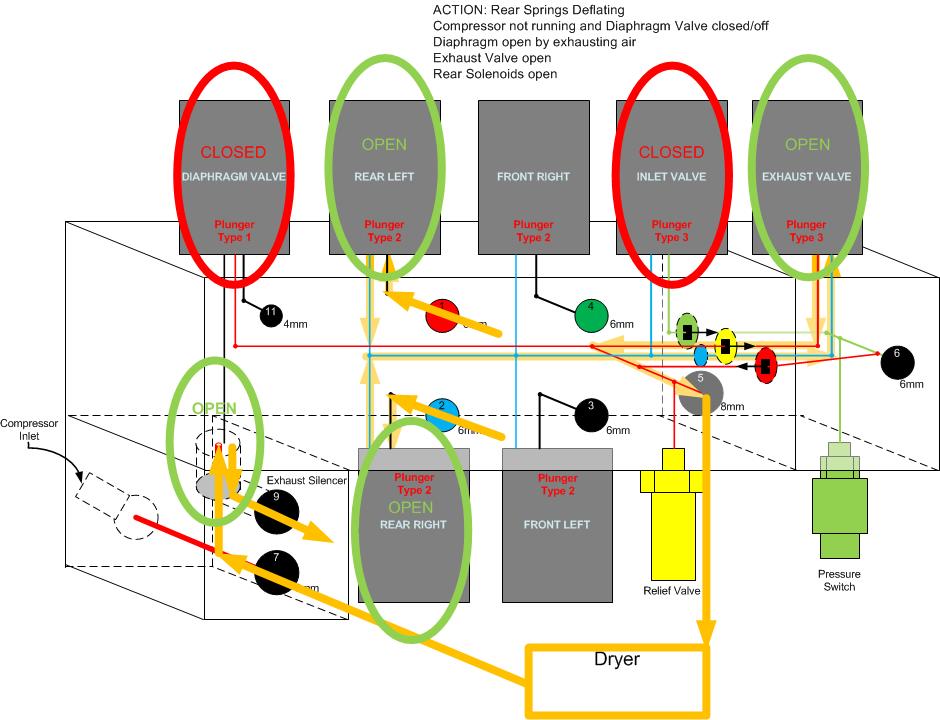
The compressor will not/should not run when the air springs are deflating.
The solenoid for each deflating bag will open to allow air back in to the valve block, and the exhaust valve will open to allow air to flow back through the dryer.
With the diaphragm valve solenoid off, the diaphragm is free to lift and allow air out to atmosphere via the exhaust silencer.
Frequently Asked Questions
Do my air springs equalise?
Yes sometimes, but just the front. When you drive off from a stop (in gear, foot off the brake pedal) the compressor will stop running for a few seconds to allow the front springs to equalise.
Why do I get the Extended Ride Height symbol on the dash?
This is a design feature intended to lift the body above an obstacle which has grounded the body.
In otherwise normal operation, it is usually due to a problem with a height sensor not being able to register a lowering of feedback within a 10 second period.
You should be able to manually select a lower height setting, or the Extended Ride should cancel itself within ten minutes, or speed increases above 50kph.
Sometimes you can reset the problem by stopping the car and switching off the engine, open a door and then close it again (causes an EAS check, even with the ignition off). Make sure all doors and the tailgate are closed, wait a minute and then start the engine. The only downside to this is that if it is a “hard fault” you may cause the car to drop to the bump stops.
Why does the compressor not run at all?
For the compressor to operate automatically, the following conditions must be met:
- Engine speed greater than 500rpm;
- Pressure switch operational (open);
- Thermal switch closed (grounded);
- Exhaust valve solenoid closed;
- Compressor Relay operational (closed) and MF2 not blown.
Where is the best location to tee-in to the air supply for an after-market pressure gauge, tyre inflation device or for an air-locker?
The most reliable location is on the line that goes to and from the air tank out of port 6 on the valve block. The compressor will attempt to maintain the tank pressure between 115-150psi. If using the EAS tank to supply air to a locker of tyre inflation device, you should install a pressure regulator after the tee-piece to drop the air pressure to that required by the application.
My car drops to the bumps stops overnight. Is it an air leak or a problem with the EAS ECU or Driver Pack?
It is quite simple to determine if the dropping is caused by a mechanical fault (air leak) or an electrical/logic problem.
Park the car as you normally would (on flat or sloped ground), and then prevent the car from self-levelling. This is achieved by either leaving a door or the tailgate open, or pulling the delay timer from under the front left seat.
If the car drops with EAS self-levelling disabled, you have an air leak in the system somewhere. If not, the EAS is sealed pretty well at the height you have set. Try leaving the car parked at different EAS height settings to see if the leak is pronounced, meaning that it is most likely a small leak in the fold of one or more air springs.
If the car does not drop at all with EAS self-levelling disabled, the problem is probably due to logic in the height sensor(s) or the driver unit. Rarely is the EAS ECU the problem. Try swapping the height sensors from side to side to change the range in which they operate, noting that you may need to recalibrate the EAS if you do so.
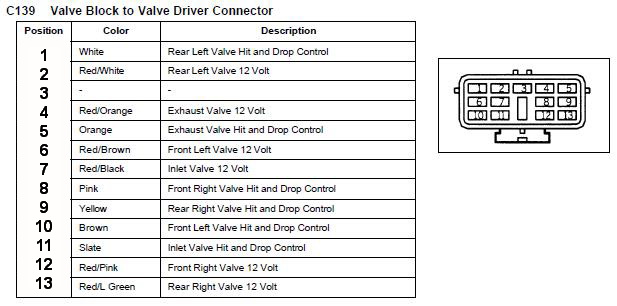
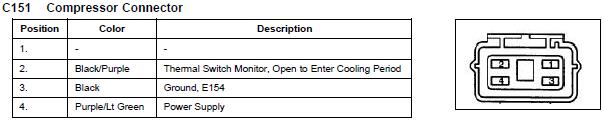
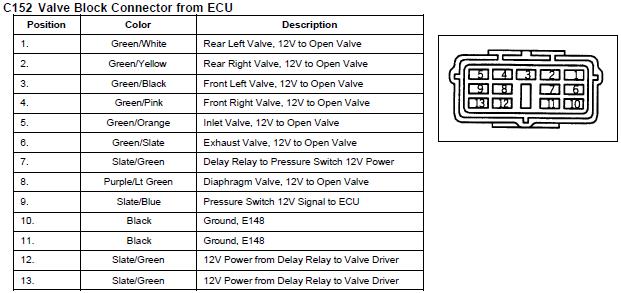
Connectors and Pin-outs for EAS Components
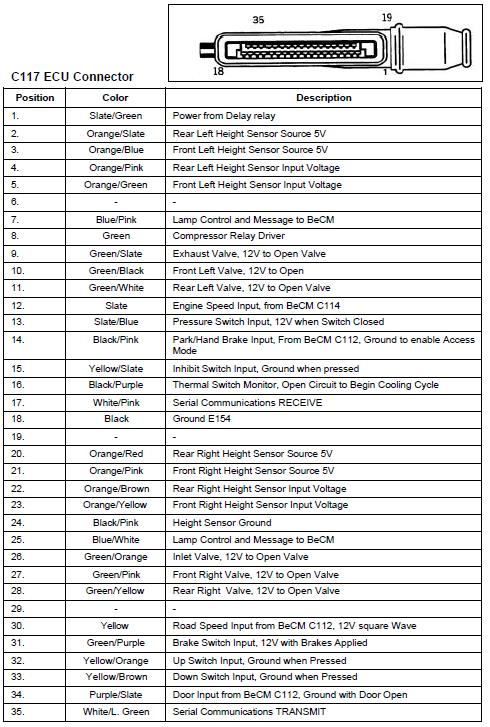
The diagram below has been modified from the original workshop manual to reflect correct pin numbering.


EAS Diagnostic Tools
More details coming….
EAS Unlock Suite from RSW Solutions
Apparently no longer available as a freeware (but you should donate) software tool, but you may still find a mirror somewhere. You need to make up your own serial to OBDII cable. It has saved so many of us over the years. Thank you Storey Wilson!
EAS Unlock V3 from RSW Solutions
info at http://rswsolutions.com/index.php/range-rover-p38a/range-rover-p38a-eas-unlock-v3
I have not evaluated this tool, but expect it to be of Storey’s usual high quality
EAS Buddy from RSW Solutions
A plug it in and away you go dongle that attempts to reset any faults in the EAS. It has a USB port that allows you to plug it in to a PC or Mac later and read the text file to see what faults it cleared.
No longer manufactured but you may find them second hand on eBay. It has been replaced by EAS Unlock V3, mentioned above.
EAS Kicker and EAS Kicker Lite from Blackbox Solutions
Info on EAS Kicker at https://blackbox-solutions.com/shop/?code=EK101&from=EAS%20KICKER%20KITS&item=EK101
A hand-held device that reads and clears faults, and also lets you modify EAS settings.
Info on EAS Kicker Lite at https://blackbox-solutions.com/shop/?code=BEKL1&from=BLACKBOX%20BASICBITS&item=BEKL1
A plug it in and away you go dongle that attempts to reset any faults in the EAS. Unlike the EAS Buddy, it does not record what faults it cleared. But if you are down on your bump stops and want to get going again, do you really care?
Nanocom Evo from Blackbox Solutions
Info at https://blackbox-solutions.com/shop/?browse=NANOCOM%20EVOLUTION
I love this bit of kit and recommend it to all P38 owners.
Not only does this do the EAS, it can talk to all other ECU’s in the car. It has a touch screen (no laptop required) and can be mounted to give real-time instrumentation while driving.
FaultMate MSV-2 from Blackbox Solutions
Info at https://blackbox-solutions.com/shop/?code=SV125&item=SV125
Great kit, really needs a laptop to be useful, and what I used for my P38’s before I got the Nanocom.
It can do more than a Nanocom like re-programme the BeCM if you fork out the extra money for licences and cables, but probably overkill for most home mechanics.
Hawkeye from Bearmach???
Never tried it, heard too many horror stories, not particularly interested as my FaultMate, Nanocom and EAS Unlock tools do everything I want.
Do your own research and make up your own mind before purchasing a diagnostics tool.